

Adjusting the rear derailleur on a bicycle - guide 2025
In an ideal world, a derailleur works like a metronome: you click once, and the chain seamlessly lands on the next cog, without a scrape or a fuss. In the real world, your bike takes a beating from mud, curbs, and racks, the hanger can bend ever so slightly, the cable gets stiff after a rain shower, and the cassette has a few miles on it. You start to experience skipping, a lack of response, or a sound that doesn't quite fit. The good news is that in most cases, you can figure it out at home—all it takes is a moment of peace, a few basic tools, and following the correct sequence.

What about the front derailleur? Check here - Front Derailleur Adjustment - A Guide for the 2025 Cyclist
Before you start turning the screws
Before you grab a screwdriver, do a little pre-service. Look at the entire drive and ask yourself:
- Is the chain clean and lubricated?
- Does the cable run smoothly in the casing?
- Does the derailleur hanger (that little "connector" between the derailleur and the frame) look crooked?
- Are the chain and cassette no longer in use?
Adjusting for dirt or wear is pointless—it's like tuning a guitar with worn strings. Basics first, then precision.
What will you need?
- screwdriver (cross-head or flat, depending on the model),
- 5 mm Allen key (if you need to loosen the cable),
- a stand or something that will allow you to turn the crank in place,
- and of course: calm and patience.
Step by step: how to adjust your rear derailleur
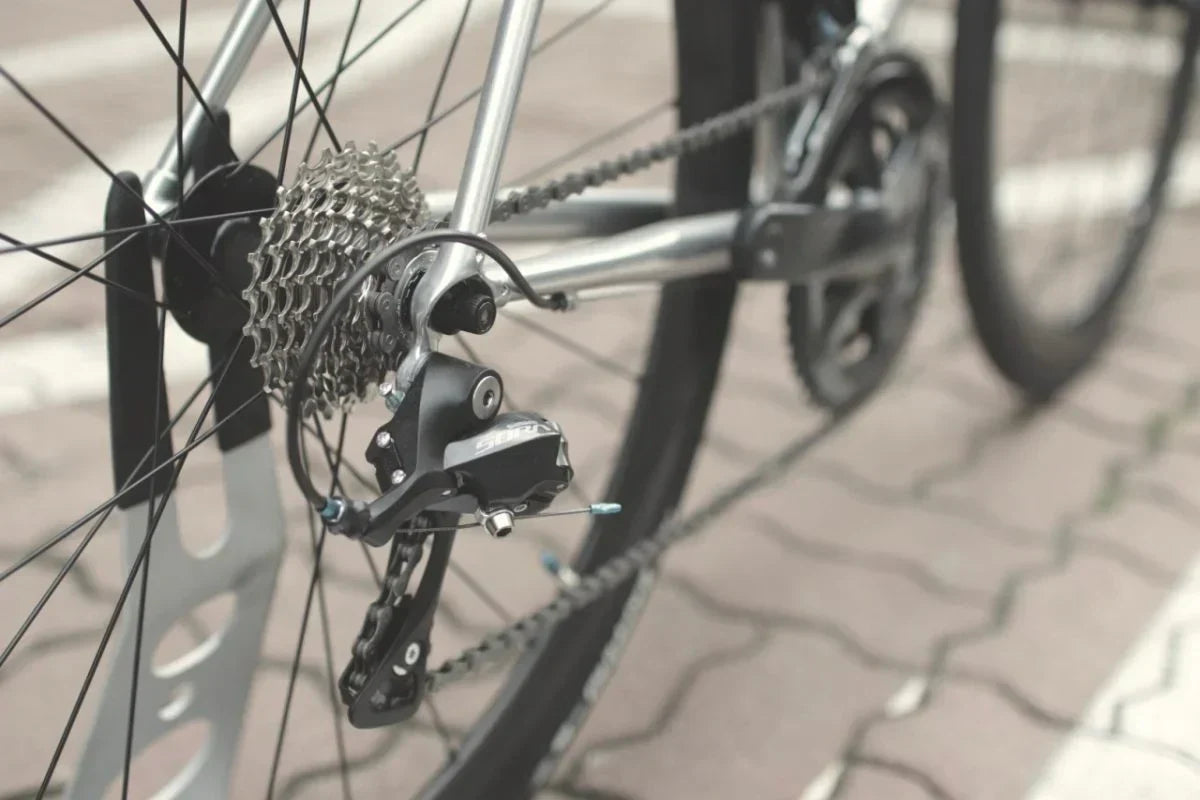
1. Set the ranges – screws H and L
Start with the limit screws. These define the derailleur's "fence" on both sides of the cassette. Set the shifter to the smallest cog and look from the rear: the upper cage roller should be directly under the smallest sprocket. If it's moving outward, slightly tighten the H screw; if it's moving toward the wheel, loosen it. Then move the chain to the largest cog and do the same with the L screw, making sure the roller doesn't drag the chain into the spokes, but also doesn't stop it too early.

2. Check the cable tension
This is the most common culprit: too loose causes sluggish shifting onto larger cogs; too tight causes buzzing and messy dropouts. Take the adjustment barrel (usually on the shifter) and work in small increments—a quarter turn can make all the difference. The rule is simple: a click should equal a shift. If the response is delayed, add a little tension; if the chain "hunts" for a cog, subtract it.
3. Set screw B - distance from the cassette
This is especially important for 1x drivetrains with large cassettes (11-50T and similar). Set the chain to the largest cog, check the distance between the roller and the cog, and adjust the B screw to leave about 5-6mm of slack. Too little clearance = noise and jerking; too much = delayed response. This is where eye and feel really come into play.

4. Click through all gears
Make a full pass of the throttle—up, down, up, down. Each click should result in a clean shift without hesitation. If a gear still feels sluggish, return to the barrel and adjust the tension a millimeter in either direction.
You might be interested in: The Best Bike Repair Shop in Wrocław? 5 Reasons to Trust Us for Drivetrain Repairs
A few words about the realities of 2025
In recent seasons, more and more gravel and mountain bikes have been switching to a 1x system, so the fun of front derailleurs is fading. But the rear derailleur—the mechanical, cable-operated kind—is still the most popular system on utility bikes. And while AXS and Di2 are slowly taking over the top end of the scale, classic solutions still reign supreme in service shops and everyday riding. That's what we're talking about in this guide—and it's still worth knowing how to adjust them yourself.
Don't want to wrestle with it?
Not everyone has the time or inclination to mess around with barrels and screws. Especially if something isn't quite right, despite being properly adjusted. It could be a slightly bent hook, worn housing, or play in the carriage itself. If you're unsure, leave the matter to us.
At our bike shop in Mokotów and our showroom in central Wrocław, we handle this every day. We'll do a quick checkup, set everything up just right—and you'll leave with a bike that works as it should.


Leave a comment